
How to Bake Batard Bread Like a Pro
There’s something deeply satisfying about pulling a golden-brown loaf of batard bread from your oven. Its crust crackles as it cools, filling your kitchen with that unmistakable aroma that speaks to something primal within us. Perhaps you’ve admired these oval-shaped loaves at your local bakery but thought they were beyond your home-baking abilities. Good news—they’re not! With the right guidance, you can create bakery-quality batard bread right in your kitchen.
The journey to mastering batard bread might seem challenging at first, but breaking it down into manageable steps makes it surprisingly accessible. Whether you’re just starting your bread-making adventure or looking to add another shape to your repertoire, this comprehensive guide will walk you through everything you need to know.
Table of Contents
What Makes Batard Bread Special?
The History and Heritage of Batard Bread
The batard shape holds a storied place in French baking tradition. Translating to “bastard” in French, the batard earned its name by being neither a baguette nor a boule—it’s the delicious middle child of bread shapes. Longer than it is wide but shorter and plumper than a baguette, the batard offers the perfect balance of crust and tender crumb.
This versatile loaf has stood the test of time because it combines the best of both worlds: enough crust to satisfy texture lovers while providing generous slices perfect for sandwiches or toast. Across European bakeries, the batard shape remains a beloved staple, cherished for its practicality and elegant appearance.
Understanding the Essence of Perfect Batard Bread
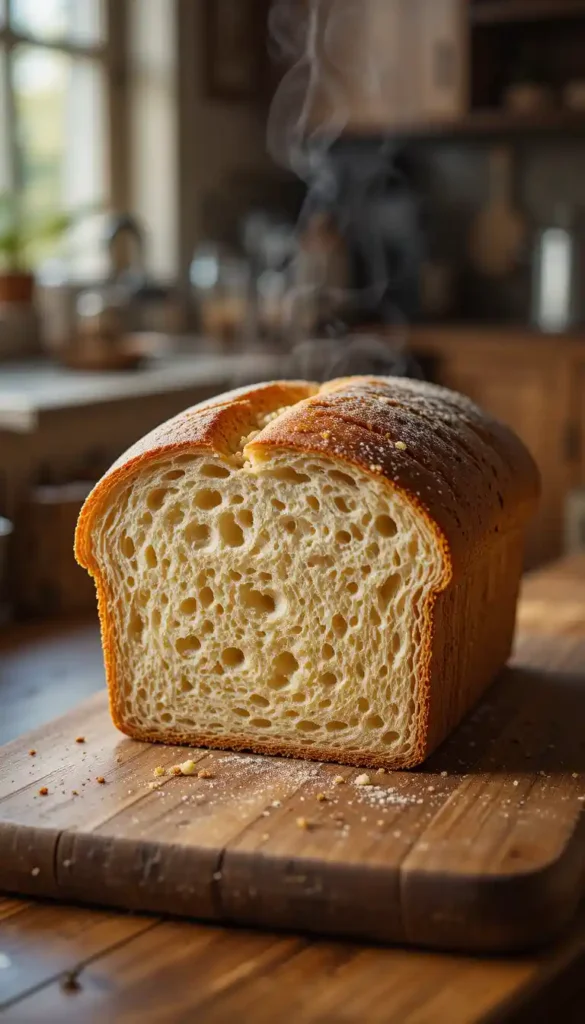
What sets exceptional batard bread apart? First, look for an open, irregular crumb structure with holes of varying sizes—a sign of proper fermentation and dough handling. The crust should be deeply caramelized, with a satisfying crackling sound when squeezed gently (bakers call this “singing”).
When sliced, your batard should reveal a creamy interior with a slight shine, indicating optimal gluten development. The flavor profile balances mild sweetness from the flour with subtle tanginess from fermentation, creating depth that store-bought bread simply can’t match.
Essential Equipment for Baking Batard Bread
Basic Tools Every Bread Baker Needs
While professional bakeries have specialized equipment, you can create excellent batard bread with surprisingly few tools:
- Digital kitchen scale: Bread baking is precision work—measuring by weight rather than volume dramatically improves consistency
- Mixing bowl: Choose something large enough to allow for folding techniques
- Bench scraper: Essential for handling wet dough and cleaning surfaces
- Scoring tool: A sharp blade (lame, razor blade, or very sharp knife) for those signature cuts
- Proofing basket: An oval banneton creates the classic batard shape and helps maintain height during proofing
Advanced Equipment for Professional-Level Results
Ready to take your baguette bread to the next level? Consider these upgrades:
- Dutch oven or baking stone: Creates the steam environment crucial for optimal crust development
- Spray bottle: For adding steam when not using a Dutch oven
- Thermometer: For monitoring dough temperature during mixing and fermentation
- Linen couche: Helps maintain shape during proofing if you’re making multiple loaves
The Science Behind Perfect Baguette Bread
Understanding Flour Selection
The foundation of exceptional batard bread begins with your flour choice. Look for bread flour with 12-14% protein content, which provides the gluten structure necessary for those beautiful air pockets and proper rise.
Many bakers find that organic flours produce better flavor, though they sometimes absorb water differently than conventional options. If you’re feeling adventurous, try adding 10-20% whole grain flour to your mix for enhanced flavor complexity—just be prepared to adjust your hydration accordingly.
The Role of Hydration in Batard Bread
Hydration—the percentage of water relative to flour weight—significantly impacts your batard bread. Beginners might start around 70% hydration (700g water to 1000g flour), while experienced bakers might push to 80% or higher for a more open crumb structure.
Higher hydration creates those coveted irregular holes but makes the dough trickier to handle. Each flour type absorbs water differently, so you’ll learn to adjust based on how your dough feels rather than strictly following recipes.
Fermentation Fundamentals
The magic of batard bread happens during fermentation, where yeasts and bacteria develop flavor compounds and create gas that forms your bread’s structure. Temperature plays a crucial role—warmer environments speed fermentation (not always desirable), while cooler temperatures slow it down (often improving flavor complexity).
Learning to read your dog’s signals takes practice but becomes intuitive over time. Look for increased volume (about 30-50% larger than starting size), a slightly domed surface, and bubbles visible along the sides of your container.
The Complete Batard Bread Recipe
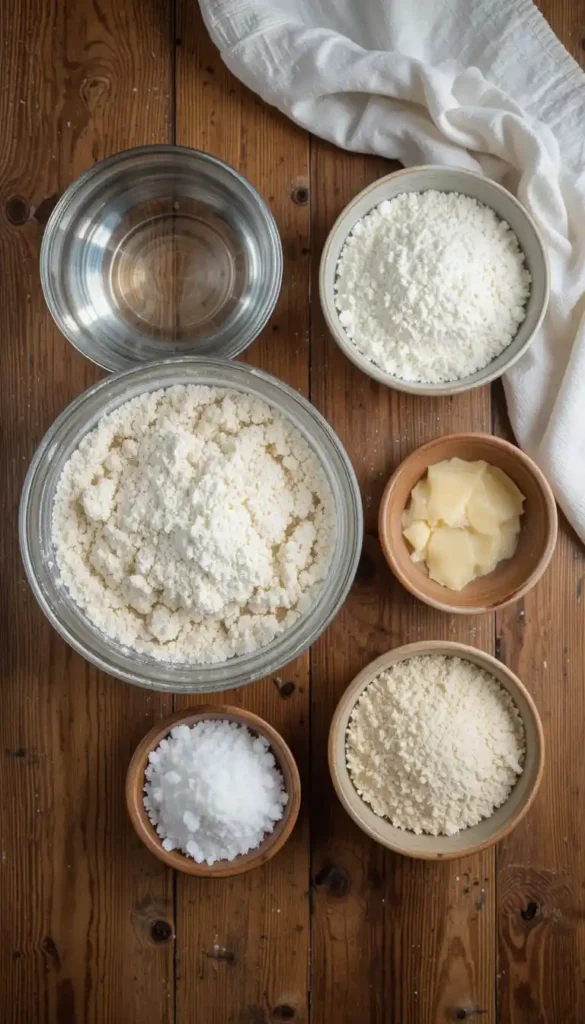
Ingredients Table
| Ingredient | Weight (for 1 loaf) | Baker’s Percentage | Purpose |
|---|---|---|---|
| Bread flour | 500g | 100% | Provides structure and gluten development |
| Water | 375g | 75% | Creates hydration and enables fermentation |
| Salt | 10g | 2% | Enhances flavor and controls fermentation |
| Instant yeast | 2g | 0.4% | Leavens the dough (or use 100g active sourdough starter) |
| Optional: seeds, herbs, olives | Up to 100g | Up to 20% | Flavor variations |
Day 1: Pre-ferment Preparation
For enhanced flavor, start with a pre-ferment the day before:
- Combine 100g bread flour, 100g water, and a tiny pinch (0.2g) of instant yeast
- Mix until no dry flour remains
- Cover and leave at room temperature (65-75°F/18-24°C) for 12-16 hours
Day 2: Batard Bread Mixing and Development
Initial Dough Mixing
- In a large bowl, combine the pre-ferment with remaining flour (400g), water (275g), and yeast (1.8g)
- Mix by hand until shaggy, then cover and rest for 30 minutes (this autolyse period allows flour to fully hydrate)
- Rest for 15 minutes to begin gluten development
Developing Strength in Your Battered Dough
Instead of traditional kneading, batard bread benefits from gentler techniques:
- First fold: With wet hands, grab one side of the dough, stretch it up, and fold to the center. Rotate bowl 90° and repeat on all four sides.
- Rest: Cover and wait 30 minutes
- Second and third folds: Repeat the folding process at 30-minute intervals
- Fourth fold: You may notice the dough becoming smoother and more elastic—this is good!
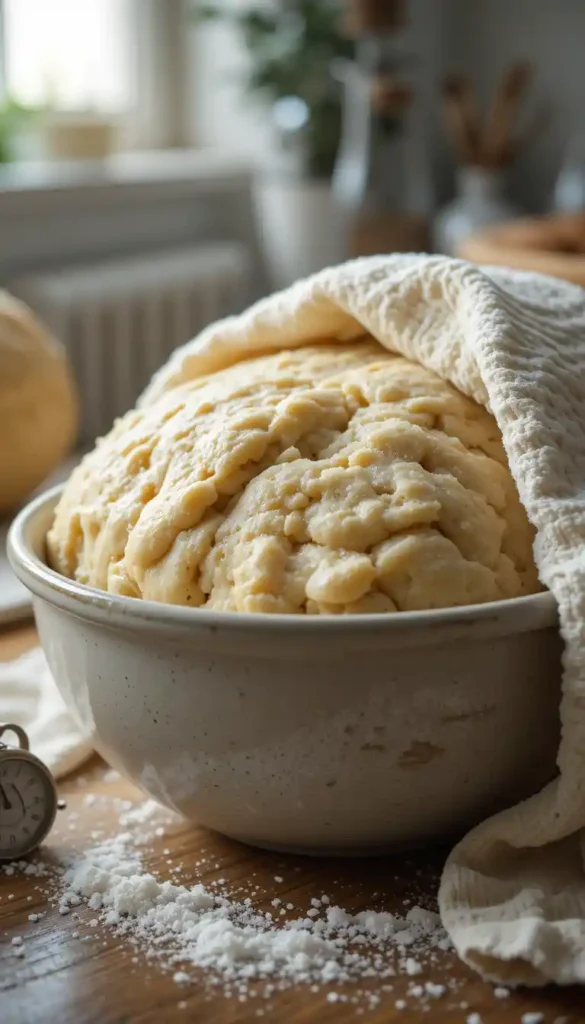
- Final rest: After completing folds, allow dough to rest covered until it has increased in volume by about 50% (approximately 1-2 hours, depending on room temperature)
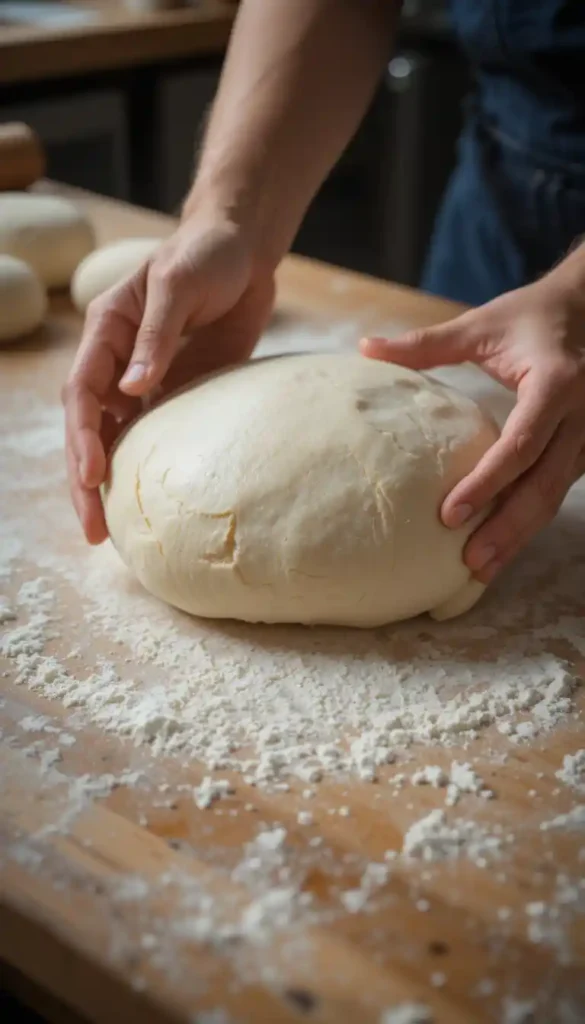
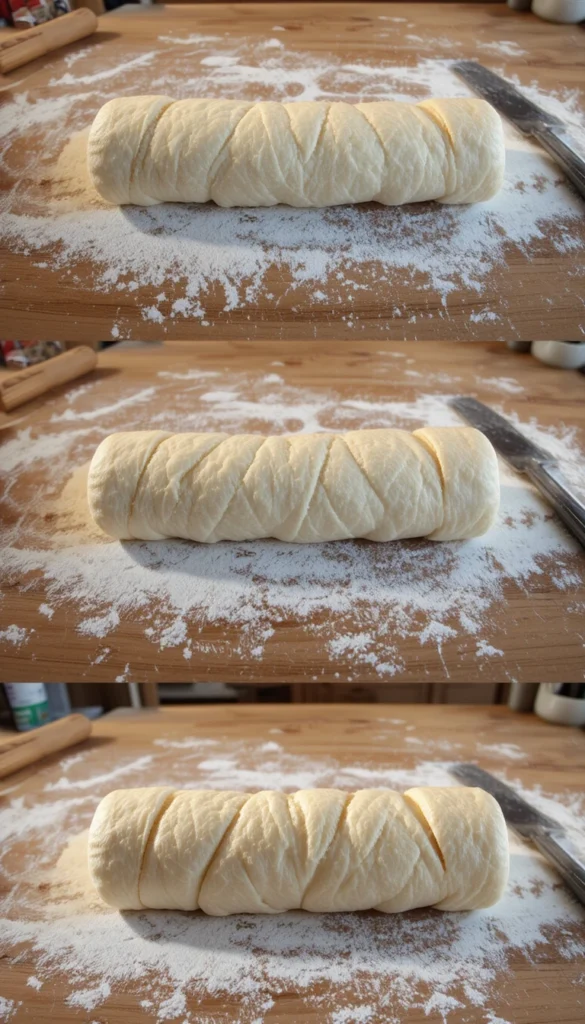
The Art of Shaping a Batard Loaf
- Pre-shape: Carefully transfer the dough onto a lightly floured work surface. Using minimal flour, form into a rough oval by folding edges toward the center
- Bench rest: Cover with a towel and rest 20-30 minutes to relax the gluten
- Final shaping:
- Gently stretch into a rectangle
- Fold the top third down like a letter
- Fold the bottom third up over it
- Roll slightly to create tension along the surface
- Seal the seam by pinching gently
- Transfer: Place the batard seam-side up in a floured oval proofing basket
Proofing Your Batard Bread to Perfection
- Allow to rise at room temperature until dough passes the finger-dent test: when poked gently, the dough should slowly spring back but leave a slight impression
- For enhanced flavor, you can refrigerate the shaped loaf (covered) for 8-24 hours instead of room-temperature proofing
Baking Techniques for Exceptional Batard Bread
Preparing Your Oven and Baking Surface
- Place the baking stone or Dutch oven in your oven
- Preheat to 475°F (245°C) for at least 45 minutes
- If using a baking stone, place an empty metal pan on the lower rack for steam creation
Scoring Patterns for Batard Bread
- Flip the proofed dough onto parchment paper or directly into a preheated Dutch oven
- Using a sharp blade, score down the center of the loaf at a 45° angle, about ¼-inch deep
- Work quickly but confidently—hesitant cuts create ragged edges
The Baking Process
- Dutch oven method:
- Place dough on parchment, lower into a hot Dutch oven
- Cover and bake at 475°F (245°C) for 20 minutes
- Bake additional 20-25 minutes until deeply golden brown
- Baking stone method:
- Slide the parchment with the dough onto the hot stone
- Pour 1 cup of hot water into an empty pan to create steam
- Bake at 475°F (245°C) for 20 minutes
- Remove the steam pan, reduce the temperature to 450°F (230°C
- Determining doneness: Your batard bread is ready when:
- The crust is deep, golden brown
- A loaf sounds hollow when tapped on the bottom
- Internal temperature reads 205-210°F (96-99°C) on instant-read thermometer
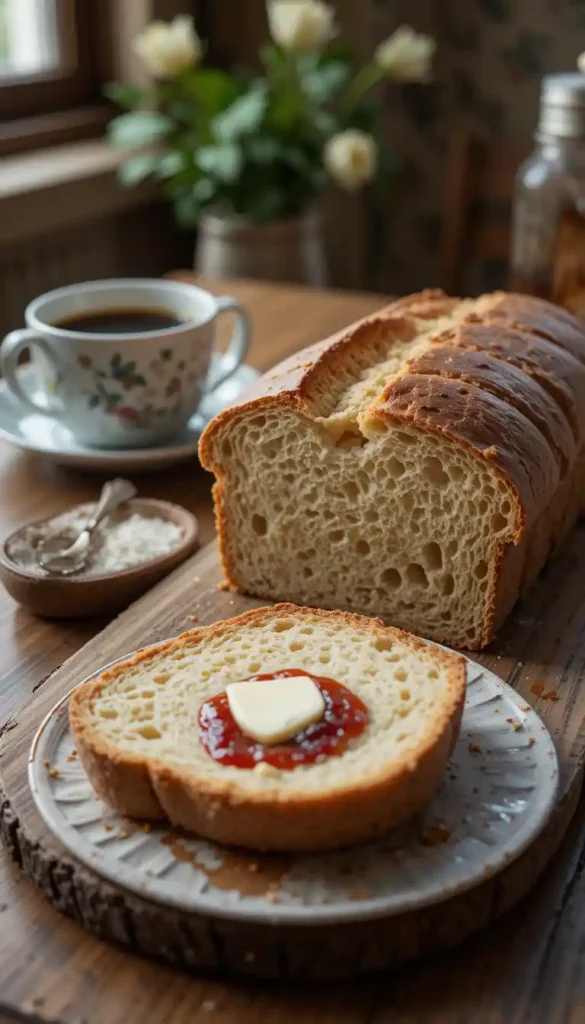
Cooling and Storage Best Practices
- Allow your batard bread to cool completely on a wire rack for at least 1-2 hours before slicing
- The cooling period completes the baking process, as residual heat continues to cook the interior
- Store at room temperature in a paper bag or bread box for 2-3 days
- For longer storage, slice completely cooled bread and freeze in an airtight container for up to 3 months
Troubleshooting Common Bread Problems
Structural Issues
- Flat loaf: Likely causes include overproofing, insufficient dough strength, or poor shaping technique. Strengthen with additional stretch-and-folds during bulk fermentation and ensure proper shaping tension.
- Dense crumb: Usually results from underproofing, insufficient fermentation, or too little hydration. Try extending the bulk fermentation time or increasing the water slightly in your next batch
Crust Problems
- Too thick/hard: Reduce baking time slightly or lower oven temperature toward the end of the bake.
- No “ears” from scoring: Common issues include a dull blade, a wrong angle, or overproofed dough.
Advanced Batard Bread Variations
Multigrain Batard Bread
Create hearty variations by adding soaked grains to your base recipe:
- Soak 100g mixed grains (oats, quinoa, millet, etc.) in 150g boiling water for 1 hour before incorporating them into your dough
- Increase main dough hydration by 5% to account for absorption from added grains
- Extend the bulk fermentation time slightly, as grains can slow fermentation
Herb and Cheese Batard Variations
Elevate your batard bread with flavorful additions:
- Add herbs (2-3 tablespoons fresh or 1-2 teaspoons dried) during final mixing
- For cheese, fold 100-150g cubed or grated firm cheese (like Gruyère or cheddar) into the dough during the second fold
- Reduce hydration slightly (by about 2%) when adding cheese, as it releases moisture during baking
Serving and Enjoying Your Batard Bread
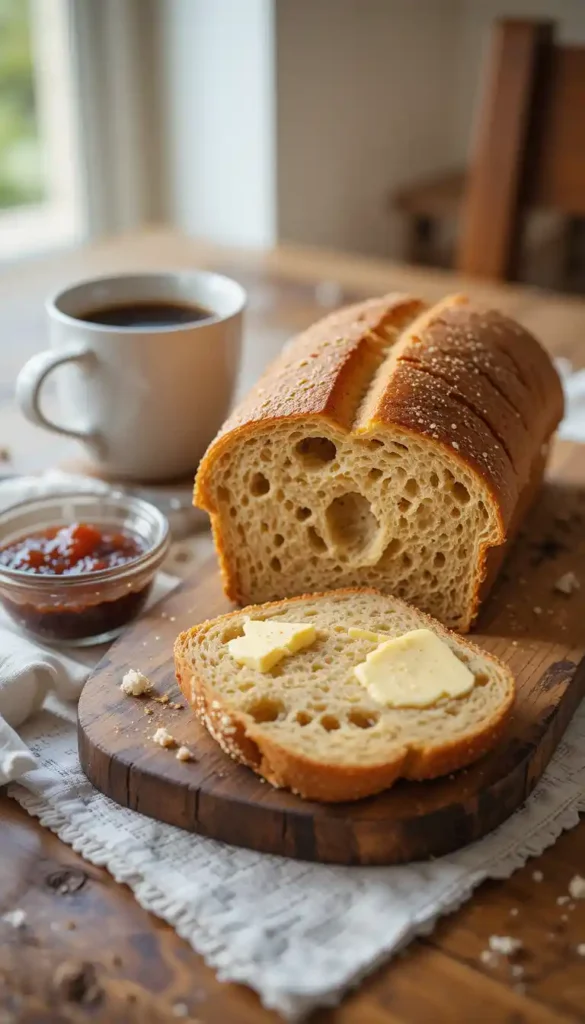
Perfect Pairings for Batard Bread
Your freshly baked batard bread shines when paired thoughtfully:
- Create the ultimate sandwich with thick-cut batard slices, high-quality meats, and artisanal cheeses
- Serve alongside soups and stews—the batard’s sturdy crust stands up perfectly to dipping
- For breakfast, try toasted batard with avocado, good butter, or as the base for French toast
Repurposing Day-Old Batard Bread
Older batard bread gains new life with these techniques:
- Tear into chunks for panzanella (Italian bread salad)
- Process into homemade breadcrumbs for cooking
- Create bread pudding with custard, dried fruits, and warm spices
Conclusion
Mastering batard bread requires practice and patience, but the rewards are immense. Each loaf teaches you something new about the interplay of ingredients, environment, and technique. Don’t be discouraged by occasional failures—they’re stepping stones toward consistency.
Remember that bread-making connects you to thousands of years of human tradition. Your batard bread journey may begin with this guide, but it will continue evolving as you develop your style and preferences.
We’d love to see your batard bread creations! Share photos on social media with #MyBatardJourney or comment below with questions and successes. The bread-baking community is wonderfully supportive and always eager to help fellow enthusiasts improve their craft.
FAQ Section About Batard Bread
What exactly is batard bread, and how is it different from other bread shapes?
The name comes from the French word meaning “bastard,” suggesting it’s a hybrid between these two classic shapes. This versatile shape gives you a perfect balance of crust and interior, making it excellent for both sandwiches and standalone serving.
Why does my batard bread flatten out during baking instead of holding its shape?
When your batard bread spreads outward rather than upward, it typically indicates either insufficient dough strength or improper shaping. Using a proofing basket also helps maintain the classic batard shape during final proofing.
Can I make batard bread without a proofing basket?
Absolutely! While oval bannetons are ideal for batard bread, you can improvise with a kitchen towel heavily dusted with flour, placed in an oval-shaped bowl, or even formed into a makeshift couche. The key is creating support that helps your dough maintain its height during proofing. Some bakers even use oblong colanders lined with well-floured cloth.
Is it possible to make batard bread with whole wheat flour?
Yes, you can make excellent batard bread with whole wheat flour, though it requires some adjustments. Start by replacing just 20-30% of the bread flour with whole wheat and increasing hydration by 5-7% to compensate for whole wheat’s higher absorption. Whole wheat ferments slightly faster, so watch your dough rather than the clock. As you gain experience, you can gradually increase the whole wheat percentage.
How long should I let my batard bread cool before slicing?
For optimal texture and flavor, allow your batard bread to cool completely on a wire rack for at least 1-2 hours before slicing. This patience-testing wait allows the crumb to set properly and completes the cooking process. Cutting too soon releases steam that’s still cooking the interior, potentially resulting in a gummy texture that seems underbaked.
Can batard bread dough be refrigerated overnight?
Not only can batard bread dough be refrigerated, but this cold fermentation produces superior flavor! The next day, you can bake straight from the refrigerator—the cold dough is often easier to score cleanly, too.
Ready to begin your batard bread adventure? Gather your ingredients, clear your schedule for a few hours of breadmaking magic, and prepare to fill your home with the incomparable aroma of freshly baked artisanal bread. Remember, each loaf improves your skills, and soon you’ll be creating batard bread that rivals your favorite bakery’s offerings. Happy baking!
Git more recipes you might like
- Perfect Zebra Cake.
- Chocolate Chip Cookies.
- Sola Bread.
- Ghirardelli Chocolate Experience.
- Best Coffee Places.
- Best Van Leeuwen Ice Cream.
Did You Try Our Recipe?
There are no reviews yet. Be the first one to write one.