
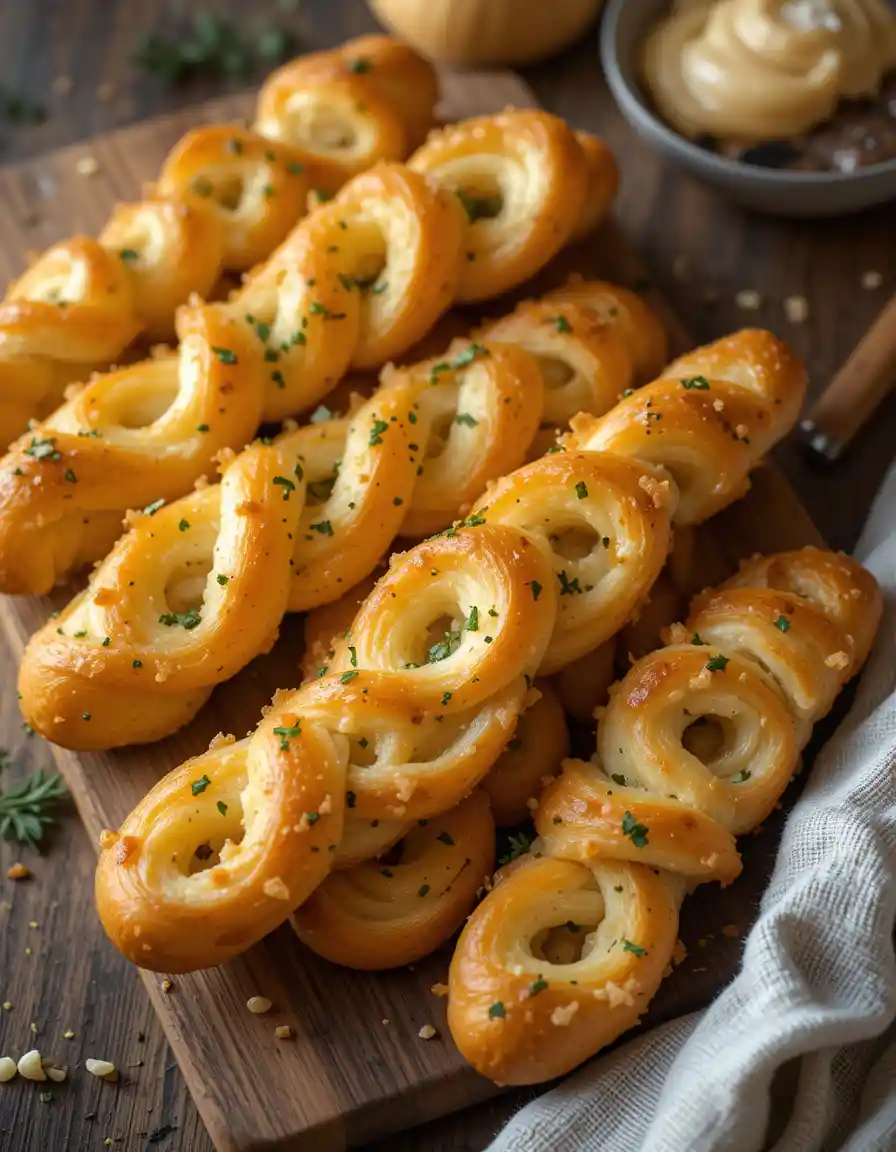
Garlic Bread Twists Recipe
Garlic bread twists are the kind of snack that disappears the second they hit the table. You know the ones—warm, golden, loaded with buttery garlic, and just the right amount of chew. They’re everything you love about garlic bread… but way more fun to eat!

Whether you’re serving them at a family dinner, game night, or just need something to dunk in your pasta sauce, these twists bring the flavor. In this post, you’ll learn how to make perfect garlic bread twists from scratch—plus a few pro tips to take them to the next level.
Table of Contents
Why You’ll Love This Garlic Bread Twists Recipe
If you’re the kind of person who can’t resist that warm, buttery smell wafting out of a bakery—or you’ve ever “accidentally” filled up on the breadbasket before dinner—these garlic bread twists are your new obsession. They’re crispy on the outside, soft and fluffy on the inside, and bursting with real garlic flavor that hits just right.
✅ Simple Ingredients, Big Flavor – No need to hunt down fancy stuff. Everything’s already in your pantry.
✅ Quick to Make – With just a few steps, you’ll go from dough to golden, garlicky perfection in under an hour.
✅ Perfect for Any Occasion – Game night? Check. Family dinner? Double-check. Midnight snack? Say no more.
✅ Better Than Store-Bought – Once you taste homemade garlic bread twists fresh out of the oven, there’s no going back to the frozen aisle.
✅ Freezer-Friendly – Bake a big batch, freeze the extras, and thank yourself later when those cravings hit.
These aren’t just another side dish—they’re the kind of comfort food that steals the spotlight. And the best part? You can make them with love and serve them up hot, just like they do at your favorite local pizzeria.
Ingredients You’ll Need for Garlic Bread Twists
Get ready to whip up the most irresistible garlic bread twists right in your kitchen! Here’s everything you’ll need—no weird ingredients, just everyday stuff that comes together like magic:
For the Dough:
- 2 ¼ teaspoons active dry yeast (or 1 packet) – helps your twists rise and fluff up beautifully.
- 1 cup warm water (about 110°F) – not too hot or you’ll kill the yeast!
- 1 tablespoon granulated sugar – to feed the yeast and add a touch of flavor.
- 2 ½ cups all-purpose flour – for that perfect soft-and-chewy base.
- 1 teaspoon salt – to balance all the flavors.
- 2 tablespoons olive oil – adds richness and keeps the dough tender.
For the Garlic Butter Topping:
- 4 tablespoons unsalted butter, melted – because more butter = more love.
- 3 cloves garlic, finely minced – the star of the show.
- 1 tablespoon fresh parsley, chopped – optional, but adds a fresh, herby finish.
- Pinch of salt – to wake up the garlic flavor.
- Grated Parmesan cheese (optional) – for a savory, cheesy twist.
Pro Tip: Want to kick it up a notch? Add a sprinkle of red pepper flakes or Italian seasoning to the butter mixture!

Step-by-Step Instructions for Making Garlic Bread Twists
Alright, now that you’ve got your ingredients ready and your dough prepped, let’s roll up our sleeves and get these garlic bread twists going. Don’t worry—it’s easier than it sounds, and I’ll walk you through every step so your kitchen smells amazing in no time.
1. Activate the Yeast
In a large mixing bowl, combine warm water (about 110°F), sugar, and active dry yeast. Give it a gentle stir and let it sit for 5–10 minutes until it gets foamy on top. That’s how you know the yeast is alive and ready to work.
If there’s no foam, your yeast might be expired. Start over with fresh yeast for best results!
2. Make the Dough
Once the yeast is activated, add in the olive oil, salt, and flour (start with 2 cups). Mix until a soft dough forms. If it’s still sticky, add the remaining ½ cup of flour a little at a time.
Knead the dough for 7–8 minutes on a floured surface until it’s smooth and elastic. You can also use a stand mixer with a dough hook if that’s your thing.
3. Let It Rise
Place your dough ball into a lightly oiled bowl, cover with a clean towel or plastic wrap, and let it rise in a warm spot for about 1 hour, or until it doubles in size.
More Easy Quick Recipes

Vinícius Jr. Transfer to Chelsea: Truth Behind the Rumor, Facts & Insights

Before You Buy Exercise Equipment – Save Money & Time

You Won’t Believe What Ronaldo Just Said About African Football

Cristiano Ronaldo Fast & Furious 11 Trailer: Real or Viral Rumor?

This Was Never Supposed to Go Public – The PSG Leak Explained
Chocolate Swiss Roll Cake
4. Roll and Twist
Once the dough has risen, punch it down (yep, literally give it a gentle punch), then roll it out on a floured surface into a rectangle—about ¼ inch thick.
5. Make the Garlic Butter
In a small bowl, mix the melted butter, minced garlic, chopped parsley, and a pinch of salt. Brush this garlic goodness generously over each twist.
Optional: Sprinkle some grated Parmesan or mozzarella on top if you’re feelin’ cheesy!
7. Final Brush & Serve
Right after they come out of the oven, give them one more buttery brush with the leftover garlic butter for maximum flavor. Serve ‘em warm with marinara sauce, ranch, or all by themselves—they’re THAT good.
✅ That’s it! You just made homemade garlic bread twists like a pro. Whether you’re serving them with pasta, soup, or as a game day snack, they’re guaranteed to disappear fast.
And there you have it—fresh, homemade garlic bread twists that smell and taste like a dream. Next up, I’ll share some insider tips to make your twists even better—because hey, who doesn’t want their garlic bread game next level?

Tips for the Best Garlic Bread Twists Ever
If you want your garlic bread twists to come out perfect every single time, here are a few insider tips I’ve picked up along the way:
- Use fresh yeast if you can — it makes a huge difference in rise and texture. Old yeast? Your dough might not puff up like you want.
- Don’t skimp on the garlic butter — this is where all the flavor lives. Feel free to double the garlic or add extra herbs like rosemary or oregano.
- Let the dough rest properly — patience here pays off with softer, fluffier twists. Find a warm spot and cover it up so it doesn’t dry out.
- Twist with confidence — the tighter the twist, the better the texture. But don’t go crazy, or they’ll bake unevenly.
- Watch the oven closely — every oven’s different. Pull your twists out when they’re golden brown but still soft inside.
- Try adding cheese — sprinkle mozzarella or Parmesan on top before baking for a melty, cheesy finish that’ll have everyone asking for seconds.
- Freeze leftovers — these freeze and reheat like champs. Wrap tightly, freeze, then reheat in the oven to bring back that fresh-baked goodness.
With these tips, your garlic bread twists won’t just be good—they’ll be legendary. Ready to impress your friends and family with your baking skills? Let’s dive into some tasty variations you can try next!
My Latest Recipes
Vinícius Jr. Transfer to Chelsea: Truth Behind the Rumor, Facts & Insights
Before You Buy Exercise Equipment – Save Money & Time
Variations to Try: Take Your Garlic Bread Twists to the Next Level
Want to switch things up and surprise your taste buds? These garlic bread twists are super versatile, so feel free to experiment with these tasty twists (pun totally intended!):
- Cheesy Garlic Twists: Sprinkle shredded mozzarella, cheddar, or Parmesan on top before baking. For extra ooey-gooey goodness, stuff the twists with string cheese before twisting.
- Spicy Kick: Mix some red pepper flakes or a dash of cayenne into your garlic butter for that perfect little heat burst. Perfect for those who like a bit of fire with their flavor!
- Herby Goodness: Add fresh or dried herbs like rosemary, thyme, or Italian seasoning to the butter mix. It adds a fragrant, earthy vibe that pairs perfectly with garlic.
- Pesto Swirls: Spread a thin layer of basil pesto over the rolled-out dough before twisting. It adds a fresh, zesty flavor that’s irresistible.
- Vegan Version: Swap butter for olive oil or vegan butter and make sure your dough recipe is egg- and dairy-free. You can still get that garlicky punch without the dairy.
- Sweet & Savory: For a wild twist, drizzle a little honey or balsamic glaze after baking. Sounds weird, but trust me—it works!
No matter which version you try, these garlic bread twists will always steal the show. Ready to store your extras and keep that flavor fresh? Let’s move on to how to store and reheat them like a pro!

How to Store & Reheat Garlic Bread Twists
Made a big batch (because, honestly, who can stop at one)? Here’s how to keep your garlic bread twists fresh and just as delicious for later:
Storing:
- At Room Temperature:
Wrap the cooled twists tightly in foil or place them in an airtight container. They’ll stay fresh for about 1–2 days. Perfect if you plan to enjoy them the next day! - In the Refrigerator:
Pop the twists in an airtight container or wrapped in plastic wrap, then store in the fridge for up to 5 days. Just remember—they might lose a bit of their crispiness, but they will still taste great.
Reheating:
- Oven Method (Best for Crispiness):
Preheat your oven to 350°F (175°C). Place the twists on a baking sheet and warm for 8–10 minutes until heated through and crispy on the outside. - Microwave Method (Quick Fix):
Wrap a twist in a damp paper towel and microwave on medium power for 20–30 seconds. This method softens the bread but won’t keep it crispy.
With these storage and reheating tricks, you can enjoy your garlic bread twists anytime without losing that fresh-baked magic. Up next, I’ll answer some common questions to help you master these twists like a pro!
More Easy Quick Recipes
Vinícius Jr. Transfer to Chelsea: Truth Behind the Rumor, Facts & Insights
Before You Buy Exercise Equipment – Save Money & Time
You Won’t Believe What Ronaldo Just Said About African Football
Cristiano Ronaldo Fast & Furious 11 Trailer: Real or Viral Rumor?
This Was Never Supposed to Go Public – The PSG Leak Explained
Chocolate Swiss Roll Cake
Serving Suggestions for Garlic Bread Twists
Now that you’ve got your golden, garlicky twists ready, the fun part begins — figuring out how to serve them up! These little beauties are super versatile and pair perfectly with all kinds of meals and occasions.
- Dip It Good: Marinara sauce is a classic—warm, tangy, and perfect for dunking those twists. Ranch dressing, garlic aioli, or even a spicy sriracha mayo bring delicious twists to your dips.
- With Pasta: Serve alongside your favorite pasta dishes like spaghetti bolognese, fettuccine Alfredo, or even a simple tomato basil pasta. The twists are perfect for soaking up every last bit of sauce.
- Soup Sidekick: Garlic bread twists and soup? Yes, please! Pair them with tomato soup, creamy mushroom, or hearty chicken noodle for a comforting combo.
- Party Snack: These twists make awesome finger foods at game day parties or casual get-togethers. Set up a dipping station with a few sauces, and watch them disappear fast!
- Salad Booster: Add some crunch and flavor alongside fresh salads like Caesar, Greek, or garden salad for a satisfying meal.
And hey, don’t forget—these twists are tasty all on their own. Just grab one (or three) fresh out of the oven and enjoy!

Recipe Summary for Garlic Bread Twists
| Recipe Detail | Information |
|---|---|
| Preparation Time | 15 minutes |
| Cooking Time | 15–18 minutes |
| Total Time | About 1 hour 30 minutes (including rising) |
| Type | Appetizer / Side Dish |
| Cuisine | Italian-American |
| Recipe Yield | Approximately 12 garlic bread twists |
| Calories | About 180 calories per twist (varies with butter and cheese) |
Final Thoughts on Garlic Bread Twists
Making garlic bread twists from scratch is one of those simple joys that turns any meal into a celebration. Every time I bake these, the buttery garlic aroma fills the kitchen and brings everyone to the table — it’s pure magic. They’re crispy, flavorful, and honestly, kind of addictive!
Thanks so much for joining me on this tasty journey. I hope you give this recipe a try and enjoy every twist and turn along the way. If you loved this, be sure to check out some of my other delicious recipes like homemade marinara sauce, cheesy pull-apart bread, and classic Italian pasta dishes.
Happy baking, and see you soon with more mouthwatering ideas!
Related Recipes You Will Love
Garlic Bread Twists FAQs
Q1: How do you make garlic bread twists from scratch?
Making garlic bread twists from scratch starts with preparing a simple yeast dough, rolling it out, twisting strips, and brushing them with garlic butter before baking. This recipe walks you through each step to get perfect, crispy-on-the-outside, soft-on-the-inside twists.
Q2: Can I use store-bought dough for garlic bread twists?
Yes! Using store-bought pizza or bread dough is a quick shortcut that still delivers great flavor. Just twist, brush with garlic butter, and bake as usual for an easy garlic bread twist recipe.
Q4: Can garlic bread twists be made gluten-free?
Absolutely! Use your favorite gluten-free dough and adjust baking times if needed. The garlic butter topping stays the same for that classic flavor.
Q5: What dipping sauces go best with garlic bread twists?
Marinara sauce, ranch dressing, garlic aioli, and spicy sriracha mayo are popular dipping options that pair perfectly with garlic bread twists.
Leave a quick review and let me know how it went!